There’s something magical about watching leafy greens unfurl in the middle of your kitchen or back porch. A tote full of water, a sprinkle of nutrients, and a few hopeful seeds can turn into weeks of fresh, tender kale with almost no fuss.
When I first tried the Kratky method—a passive style of hydroponics that doesn’t use pumps, bubblers, or electricity—I was skeptical. Could something this simple really work? But once I harvested my first tote of kale, I was hooked.
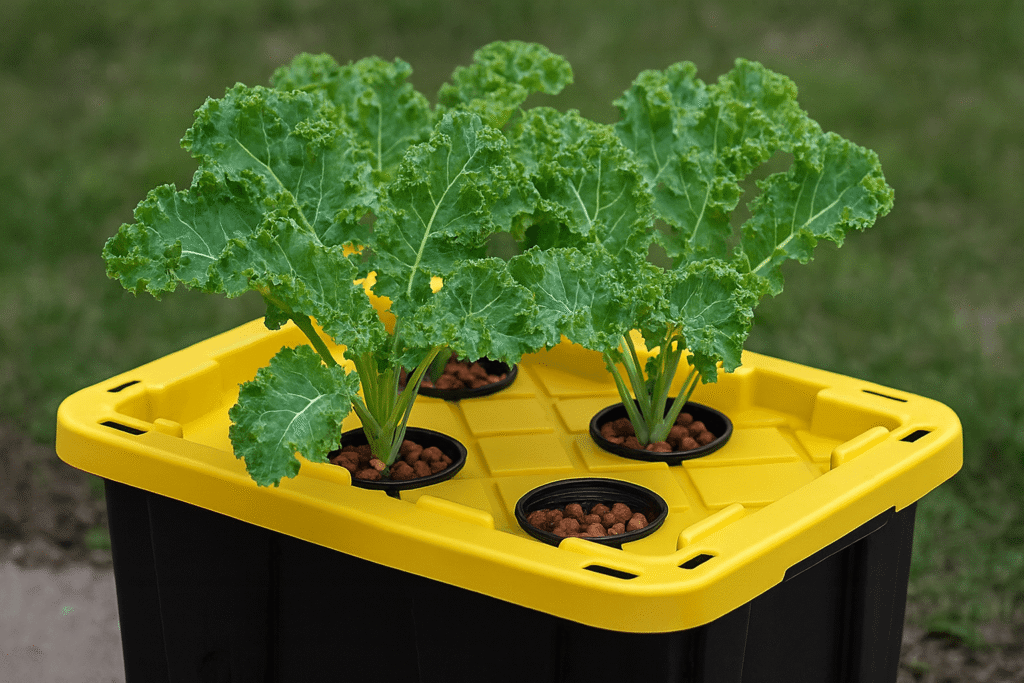
Let me share how I grow kale the easy Kratky way, using nothing more than a Rubbermaid tote, a handful of basic supplies, and a little sunlight.
What You’ll Need
The beauty of the Kratky method is how inexpensive and beginner-friendly it is. Here’s my go-to setup:
- Dark, opaque Rubbermaid tote (to block light and prevent algae)
- Net cups (2–3″)
- Expanded clay pellets (to anchor the plants and block light)
- Rapid Rooter starter plugs for seeds
- Kale seeds (I love Lacinato, but any variety works)
- MaxiGrow fertilizer (1 tsp per gallon of water)
- pH testing kit + pH Up/Down solution
- TDS meter (to check PPM—nutrient concentration)
- A drill or hole saw (to make cup-sized holes in the tote lid)
Setting Up Your Tote Garden
- Drill the lid to fit the net cups, spaced several inches apart so the kale has breathing room.
- Fill the tote with water, leaving about 2–3 inches of air space beneath the cups.
- Stir in MaxiGrow fertilizer – 1 teaspoon per gallon of water.
- Test the pH. Kale likes a range of 6.2–6.8. If your water is closer to 7, adjust with pH down.
- Insert seeds into Rapid Rooter plugs, and place them in the net cups. Surround each plug with expanded clay pellets.
That’s it. No cords, no pumps, no humming noises—just a quiet little tote of greens beginning to sprout.
The Light Factor: Helping Kale Thrive
Kale loves the sun, but like most seedlings, it prefers a gentle start. Here’s the rhythm I follow:
- Germination phase: While seeds sprout, I keep the tote in a spot with dappled light or shade.
- After sprouting: I move the tote where it can enjoy 2–3 hours of gentle morning sun.
- One week later: The seedlings are strong enough for full sun exposure.
💡 Tip: If your growing spot gets nothing but harsh, all-day sunlight, you can make a simple sunshade using four bamboo stakes and a piece of burlap shade cloth. It creates a softer light environment—like a little sun hat for your kale.
Why I Stick with MaxiGrow
There are plenty of nutrient options for hydroponics, but MaxiGrow has earned a permanent place on my shelf. It stabilizes the pH beautifully—so once I get the water in range, it stays steady for weeks.
Kale isn’t a heavy feeder either, so I don’t usually add more nutrients. As the water level drops, the PPM (parts per million) naturally climbs higher. If the roots are still happily drinking, I don’t fuss. Toward the very end, if I need to top off, I always pre-mix fresh water with nutrients and pH balance before pouring it in.
Weekly Care Checklist
Once your tote is planted, caring for it is refreshingly simple. Each week I take two minutes to:
- Check the water level (but don’t refill unless roots are exposed)
- Test the pH (should hold between 6.2–6.8)
- Measure PPM (aim for ~600)
That’s it. Kale practically grows itself from here.
Harvest Time
- Sprouting: 3–7 days
- Baby kale: ~3 weeks
- Full leaves: 4–6 weeks
I use a cut-and-come-again method—snipping outer leaves and letting the center keep producing. A single tote can provide weeks of salads, stir-fries, and soups.
Troubleshooting Quick Fixes
- Algae showing up? Cover any light leaks with foil tape or dark plastic.
- Yellowing leaves? Double-check your PPM—too high or too low can stress the plant.
- Leggy seedlings? They’re craving more light. Move them to sunnier spot or supplement with a grow light.
Why the Kratky Method Feels Like Magic
Every time I peek into my tote and see the roots stretching deep into the nutrient water, I can’t help but smile. It’s such a quiet, forgiving way to grow food. No pumps to fail, no timers to forget.
The first time I cooked a simple kale and potato soup with leaves from my tote, it reminded me of my grandmother’s kitchen—hearty, green, and deeply nourishing. Except this time, instead of pulling kale from the garden, I lifted the lid of a humble Rubbermaid tote.
And honestly? It tasted just as sweet.